
You can easily add and extend disk on Virtual Box through some LVM manipulations. LVM (Logical Volume Partitioning) is a device mapper target that provides logical volume management for the Linux kernel. - Wikipedia. However, I have written a brief introduction about LVM on a previous post - Managing LVM with pvmove - Part 1.

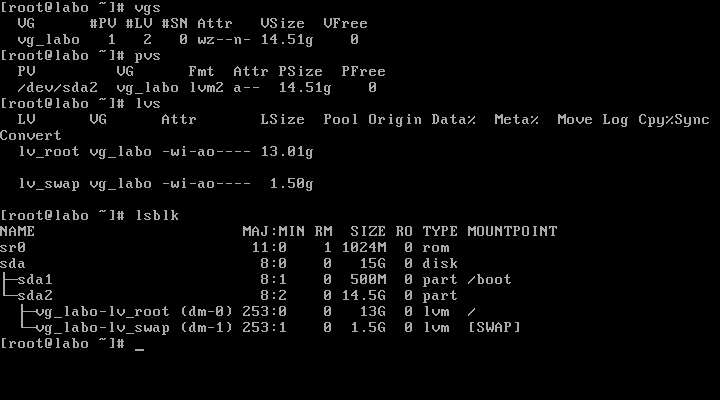
Prior the extension is made you need to assure yourself there that you already know the actual state of the machine' s hard disk.
Those commands are helpful to perform your analysis before the operation is carried out.
>> fdisk -l
> pvdisplay >> vgdisplay >> lvdisplay >> vgs >> lvs >> vgs >> lsblk
Here is the state of the disk before the operation is carried out.
Now, you can get into your Oracle VM VirtualBox Manager to add the new disk.
The steps are :
- Click on the 'Settings' option on the VirtualBox Manager after having selected your virtual machine which you intend to perform a disk extension. In my case, it's the 'centos6' one.
- Then, on the 'Storage' option, next to the "Controller: SATA" there is an icon to "add new hard disk".
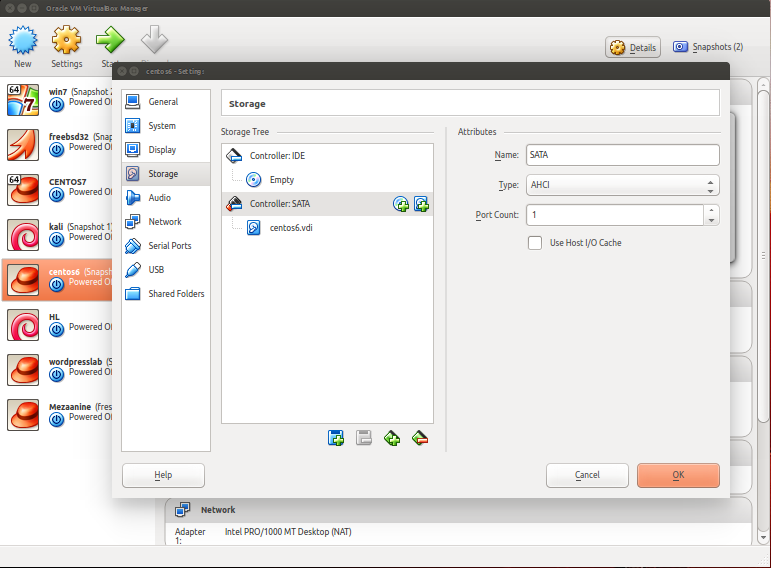
- Once you have click on the "add new hard disk" it will prompt you to "cancel" "choose existing disk" and "create new disk". Choose "create new disk". Of course, you can also choose an existing disk, but here we are adding a completely new fresh disk.
- Afterward, it will prompt a "create Virtual Hard Drive" box. Choose "VDI". Click on next, then on "dynamically allocated". Give a new name to your hard disk. In my case, I am adding a new 2GB hard disk. Click on create and you are done.
- Boot your machine if you are on VirtualBox, then fire the lsblk command to see your new hard disk. See screenshot below. You can also check with the fdisk -l command as well as the dmesg log which is really helpful.
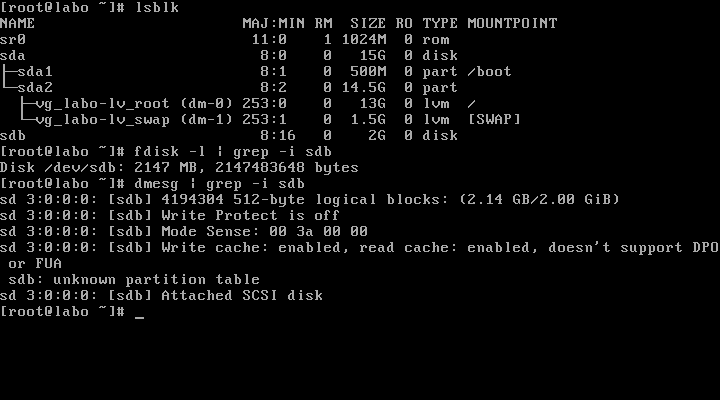
- Once the disk is detected, start by converting the disk to the PV using the command pvcreate /dev/sdb. You will notice that if you launch again a pvs the new disk is now on the PV but no part of the PV is allocated to any VG. As you can see in the picture below here is the new sdb which now forms part of the PV
- Now we will extend the actual VG called vg_labo. Use the command vgextend vg_labo /dev/sdb

- Once this is completed, you can now choose which LV you will extend. I am choosing the LV called lv_root. Use the command lvextend -l +100%FREE /dev/vg_labo/lv_root
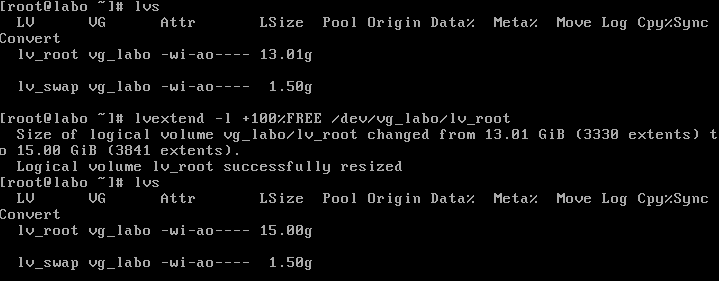
The disk is now extended. You can also verify with the command df -h. You can also check out the following article on how to perform a pvmove.
Tips:
-
- On Virtual Box, you cannot add a new disk if your machine is running compared to VMware. To be able to solve that issue, you will need to shut down the machine to be able to add the disk.
- If ever after adding a new hard disk, you noticed that the disk is not being detected just stay cool, as you might need to troubleshoot between LUNs on VCenter. Use the following command:
ls /sys/class/scsi_host/ | while read host ; do echo "- - -" > /sys/class/scsi_host/$host/scan ; done
- You can also use the script rescan-scsi-bus.sh after having to install the sg3_utils package to troubleshoot for LUN detection.