
A few days back, we have seen the installation of the Puppet server and Puppet Agent on the RHEL7 environment. In this article, we will focus on the technical part to administer and write manifests in the Puppet server to instruct the Agent. If you landed directly in this article, consider viewing the 10 steps to install the Puppet configuration management tool before continuing further in this article. Otherwise, I invite you all to continue on in this discovery of what Puppet is capable of.
All manifests will be available on the My-Puppet-Manifests Github repository.
![]()
The first keyword that someone should be familiar with is "resource". In Puppet everything is a resource. The second keyword is "manifest". To instruct the Puppet server, we have to write a file with the extension '.pp' and it is called a manifest.
1. To check what are the resources in Puppet, you can use the following command:
puppet resource --type
2. You will notice a lot of resources. Let's say you want to get more details about the resource called 'file', use the following command
puppet describe file
3. Let's do something locally. let's create a file in /tmp called test.txt. Create a file called file.pp as follows:
file {'/tmp/test.txt':

        ensure=> file,

        content=> "My first puppet file",

}
This is very simple to grasp. 'file' here is an attribute, the /tmp/test is a 'content' and ensure is the 'attribute'. The content inside the attribute is the 'value'.
4. To apply it with puppet locally use the following command:
puppet apply file.pp
You would notice that the file has already been created in the /tmp directory with the content as well.
5. If you want to remove the file use puppet apply file.pp but instead of ensure => file use ensure => absent.
file {'/tmp/test.txt':

 ensure=> absent,

 content=> "My first puppet file",

}
6. In the same manner, if you want to create a directory instead, use ensure => directory.
7. You can also check if you have any syntax error in your Manifest by using the following command:puppet parser validate file_absent.pp
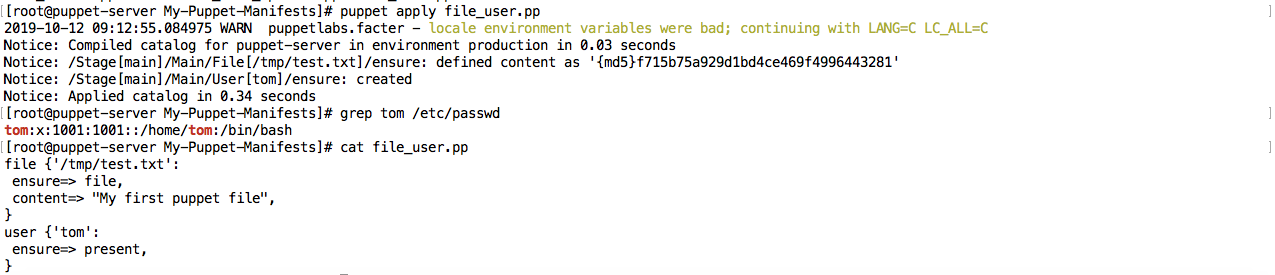
8. You can also create a user and at the same time add it in the same playbook of that of file. For example:
file {'/tmp/test.txt':

 ensure=> file,

 content=> "My first puppet file",

}

user {'tom':

 ensure=> present,

}
user {'harry':

 ensure=> present,

 comment=> "Harry Bell",

 shell=> '/sbin/nologin',

 home=> "/home/harry",

}
10. Another interesting resource is 'service':
service{ 'sshd.service':

 ensure=> 'running',

 enable=> 'true',

}
At this stage, it should be very clear how to create puppet manifest and execute locally. I create a Github repository to store all the Puppet Manifests. In the next blog post on Puppet, I will share more details. If you like it do comment below :-)