
Setting up a mail server is very simple if you understand the basic concept. In this blog post, I'm going to focus on the installation of a basic mail server using Postfix (MTA), Dovecot(MDA), and MariaDB. I will explain it stepwise and move along the basics too on this blog post. Also, consider having a VPS or any server with a public IP address ready for the mail server. Some guys for testing purpose, try to hide their dynamic public address using other tools over the internet. I guess you must be ready by now. I am also using an RHEL6 machine for this installation. The concept remains the same in case you want to install on an RHEL7/8 or Ubuntu server machine. Let's see what are some tools and prerequisites needed for the installation:
[caption id="attachment_4282" align="alignnone" width="300"]- DNS record for your mail server.
- Some Firewall rules to be allowed.
- Postfix (MTA) - A Mail Transfer Agent that permits you to route and delivers electronic mails. Postfix is both an SMTP server and an SMTP agent.
- Dovecot (MDA) - A Mail Delivery Agent that primarily used as a mail storage server. It is a secure IMAP and POP3 server. It can also act as a mail proxy server.
- MariaDB - A database server where you will store the users, domains, and aliases.
Now, in the real world, this is not the case as we need other accessories to enhance security, robustness, and integrity. Implementation of Dovecot with MariaDB w/ SASL interconnection for the mail server. DKIM, DANE, SPF, and DMARC are other accessories that need to be used. I will get in detail about those terms in future articles. In this article, I will focus on a classic basic mail server.
Adding the DNS record
1. You will need to add an 'A' DNS record, followed by an 'MX' record. I blurred the IP Address here for security purposes.

Some Firewall rules here
2. You will also need to allow IMAP (143) and SMTP(25) on the machine
iptables -I INPUT -p tcp -s 100.100.100.100 --dport 143 -j ACCEPT
iptables -I INPUT -p tcp -s 100.100.100.100 --dport 25 -j ACCEPT
3. SSH on your server, add an entry in your /etc/hosts file. Example:
100.100.100.100 mail.tunnelix.com
Postfix configuration and installation
4. Install the Postfix using the following command:
yum install postfix
5. Now, the configuration to modify at the /etc/postfix/main.cf are as follows:
queue_directory = /var/spool/postfix
command_directory = /usr/sbin
daemon_directory = /usr/libexec/postfix
data_directory = /var/lib/postfix
mail_owner = postfix
myhostname = mail.tunnelix.com
mydomain = tunnelix.com
myorigin = $mydomain
inet_interfaces = all
inet_protocols = all
mydestination = $myhostname, localhost.$mydomain, localhost, $mydomain
unknown_local_recipient_reject_code = 550
alias_maps = hash:/etc/aliases
alias_database = hash:/etc/aliases
home_mailbox = Maildir/
mail_spool_directory = /var/spool/mail
debug_peer_level = 2
debugger_command =
         PATH=/bin:/usr/bin:/usr/local/bin:/usr/X11R6/bin
         ddd $daemon_directory/$process_name $process_id & sleep 5
sendmail_path = /usr/sbin/sendmail.postfix
newaliases_path = /usr/bin/newaliases.postfix
mailq_path = /usr/bin/mailq.postfix
setgid_group = postdrop
html_directory = no
6. Launch the following command:
postfix reload && /etc/init.d/postfix restart
7. A netstat -ntpl should show port 25 is listening on all IP Addresses.
8. A telnet mail.tunnelix.com should prompt you the following:
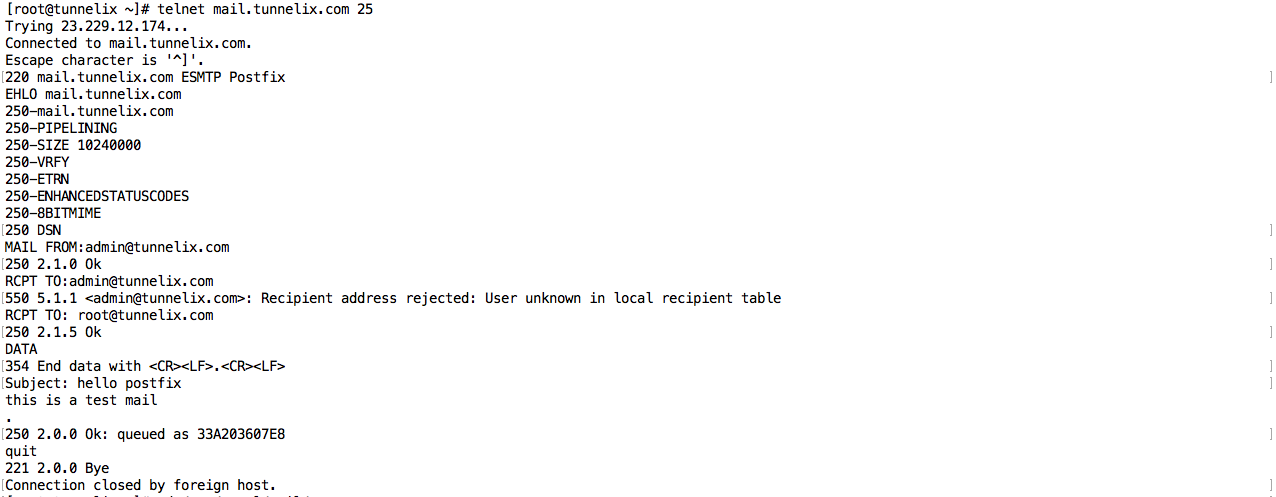
Notice the ESMTP Postfix after doing the telnet which means that the Postfix server is up.
9. At this level, you should able to send yourself an e-mail from your Gmail which proves that your Postfix is working pretty fine.
10. The mailbox is located in the directory /Maildir. Let's say you have a user called 'Tom' and you have sent the mail to [email protected], then you should get the mail in /home/tom/Maildir.
Dovecot installation and configuration
11. Perform the installation of the dovecot package and its dependencies:
yum install dovecot
12. Edit the /etc/dovecot/dovecot.conf file and set up the following parameter:
listen = *,
13. Edit the /etc/dovecot/conf.d/10-auth.conf and set up the following parameter:
disable_plaintext_auth = no

auth_mechanisms = plain login
14. Edit the /etc/dovecot/conf.d/10-mail.conf and set up the following parameter:
mail_location = mbox:~/mail:INBOX=/var/spool/mail/%u

mail_privileged_group = mail
15. Okay, at this stage, you should see that the dovecot service is running and telnet localhost on port 143 should show you 'Dovecot Ready'.

Testing your mail system
16. You can test your outgoing mail as follows:
echo "This is a test" | sudo mail -s "This is a test" [email protected] -aFrom:[email protected]
17. For incoming mail check in the following directory directory:/var/spool/mail/vhosts
Tips:
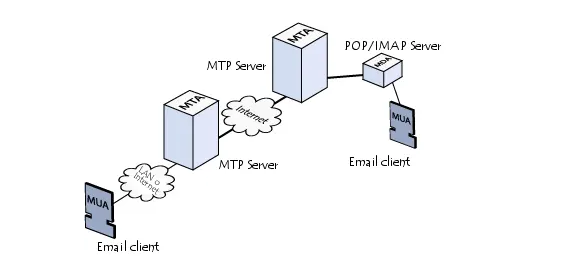
- Some terms to grasp are important to understand the basics behind mail transmission/reception.
-
- MUA (Mail User Agent - A software used for mail message retrieval, commonly known as an email client, such as mutt, Evolution, and Thunderbird ),
- MTA (Mail Transfer Agent is a software that transfers mail from one device to another using SMTP.
- MDA (Mail Delivery Agent is another software component that helps with the delivery of email.
Note: This type of Mail configuration is for Learning purposes only. Do not apply to the production environment without considering security implications. In future articles, I will explain an example of how to secure your mail using DANE, DMARC, SPK, and DKIM.