
One of the most challenging tasks in a production environment with Docker is to build images and publish ports. As promised in the previous article I will publish more articles on Docker images. So, here we are! For those who missed the previous articles on Docker, firstly we have the basic installation of Docker and some basic commands and secondly, we have an article dedicated about 30 basic commands to start with Docker container. Note that all illustrations and commands in this blog post have been tested on Fedora.
Building Docker images
What is a Docker image? Firstly, we need to understand what is an image. It is a compressed self-piece of software. Once unwrapped, it becomes meaningful to use because it's all about the functionality that makes the image useful. An image could contain software, operating system, a service, etc.. On the other hand, the Docker image is created by a series or sequence of commands written to a file called "Dockerfile". Whenever you execute the Dockerfile using Docker command, it will output an image, thus, a Docker image. In this blog post, we are going to build a Docker image using existing Docker image.
1. As described in the article "30 basic commands to start with Docker container" in part 3, to view the current images available you can use the following command:
docker images
2. In my case, I have a Centos image. My goal is to make a Docker image which has Apache web server already pre-installed. Now, there are two methods to create an image from the existing one. The first is the commit method with the Docker commit command which is not extensively used due to less flexibility. The other is by creating a Docker file. In my home directory, I created a directory at /home/webserver. Now, this directory will be used to build up the web server. You can also create an index.html file to be used as the index page of the web server. Use the following basic commands:
mkdir /home/webserver && touch /home/webserver/{index.html,Dockerfile}
3. I then edited the index.html. Let's enter some random phrase in it for testing purpose.
This is a test by TheTunnelix
4. Edit the Dockerfile and define the Dockerfile as indicated below. From the comment section, I gave some explanations for each line:
FROM centos:latest # Take the latest image.
LABEL tunnelix.com <[email protected]> # Just a reference using my E-mail.
RUN yum install httpd -y # Run the command to install HTTPD.
COPY index.html /var/www/html # Copy from webserver folder to the docroot.
CMD ["/usr/sbin/httpd", "-D", "FOREGROUND"] # Always launch the binary to start the daemon HTTPD.
EXPOSE 80 # Run Apache on port 80. This port need to be exposed to run the HTTPD webserver.
5. Now, point yourself in the directory where your Dockerfile and index.html is located. We will build the image using the Dockerfile using docker build command.
docker build -t centos:apache .
6. You can check it using the command docker images and you should notice that a new image has been created which has been tagged with apache. You also view details all steps using the following command:
docker images -a
7. To run it, you can use:
docker run -dit --name=ApacheTunnelix centos:apache
At this stage, a docker ps will show you the container running. Remember from the article "30 commands to start with Docker container" in part 24, we learned that Docker will create a bridge. You can check it using docker network ls. You can also confirm it using the command brctl show command.
8. When launching the command docker inspect in the section containers, I can notice my container is accessible with the IPAddress 172.17.0.2 and same is accessible on my browser with the same content of the index.html file created in section 3. You can also check it using the following curl command:
curl http://172.17.0.2
Publishing the port
9. The point is that the container ApacheTunnelix with IPAddress 172.17.0.2 is not available outside the physical host onto which I am running my Docker engine. The catch is that we need to go through a step called publishing ports.
10. I will now create another web server to better differentiate between the container (ApacheTunnelix) accessible locally and that another container (Let's call it ApacheTunnelixProd) which need to be accessible on the same network of the Physical machine. I copied the directory /home/webserver to /home/webserverprod and pointed myself inside the directory webserverprod.
cp -rp /home/webserver /home/webserverprod && cd /home/webserverprod
11. For my own reference, I change the index.html to:
This is a test by TheTunnelix on Prod.
12. Repeat step 5 by building a new image with a new name:
docker build -t centos:apacheProd
13. Compare to step 7 where we have run the container without publishing the port, this time we will run it by publishing the port from outside the physical machine. By default, the container will run on port 80. To make it accessible, say on port 5000, we use the following command:
docker run -dit --name=ApacheTunnelixProd -p 5000:80 centos:apacheProd
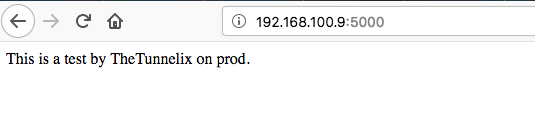
14. By now the container should be accessible on any IP on the network of the local machine including localhost. In my case, the IP address of my physical machine is 192.168.100.9. You can test it using the command:
curl http://192.168.100.9:5000
Or you can simply access your machine from a browser:
15. A docker ps is of great importance to understand as same will show you from the source and destination of the port mapping. Another interesting command to understand the port mapping is the docker port. For example:
docker port ApacheTunnelixProd
This will show the following result:
80/tcp -> 0.0.0.0:5000
In the next article on Docker, I will share some more interesting tips on Docker Networking. keep in touch and comment below for suggestions and improvements.
Tips:
- EXPOSE allows anyone outside the container to access the web server on the port 80. If you do not expose it, the web server will not be accessible outside the container.
- CMD allows you to run a command as soon as the container is launched. CMD is different from RUN. RUN is used whilst building the image and CMD is used whilst launching the image.
- Always check the official Docker documentation when creating Dockerfile.
- You always stop a running container using the command docker stop <name of the container>. For example, docker stop ApacheTunnelixProd.
- Also, you can remove a container with the command docker rm <name of the container>. For example, docker rm ApacheTunnelixProd.
LABEL vendor="ACME Incorporated"
LABEL com.example.release-date="2015-02-12"
LABEL com.example.version.is-production="