Terraform is an open-source tool created by HashiCorp and it is written in Go programming language. Using Terraform allows us to define our infrastructure as a Code by using declarative language. It's important to understand that Terraform language is declarative, which describes an intended goal rather than the steps to reach the goal. Once you define your infrastructure, Terraform will figure out how to create it. Terraform also supports a variety of cloud providers and virtualization platforms such as AWS, Azure, VMware, OpenStack, etc.. This is pretty cool as it eliminates several tasks, for example, to create several AWS instances.
[caption id="attachment_4196" align="alignnone" width="1200"]
Installation of Terraform
1. This is pretty simple. You just have to go on the official website and download the package. In my case, I am on a Linux machine, and I am choosing a Linux 64 bit package.
To download and unzip it, use the following command:
wget https://releases.hashicorp.com/terraform/0.12.10/terraform_0.12.10_linux_amd64.zip && unzip terraform*.zip
2. I moved the binary to /usr/local/bin. Make sure it is in the path environment variable.
mv terraform /usr/local/bin
3. By this time, you should get your binary and be able to check the version.
terraform version
Setting up API call for Terraform on AWS
4. We also need to allow terraform to make an API call on our behalf. I will be calling the API on AWS. For that, you will need to create a user on the AWS IAM and assign the rights and policies. Assuming that you have already created the user and you have the credentials to move ahead. Use the following commands:
export AWS_ACCESS_KEY_ID="AKIA***************"
export AWS_SECRET_ACCESS_KEY="mVTwU6JtC***************"
export AWS_DEFAULT_REGION="us-east-1"
Writing the codes
5. Once you are done exporting the credentials, you can start building your Terraform code. The whole code is in my Github and you can download it for free.
The first thing is to configure the provider and the region.
provider "aws" {

 region = "us-east-1"

}
6. Each provider supports different kinds of resources such as load balancers, servers, databases, etc.. In this example, we are trying to create a single EC2 instance. I have chosen the AWS Linux OS and the smallest nano server. The tags are just the identifier in AWS.
resource "aws_instance" "web" {

  ami           = "ami-0b69ea66ff7391e80"

  instance_type = "t2.nano"

}
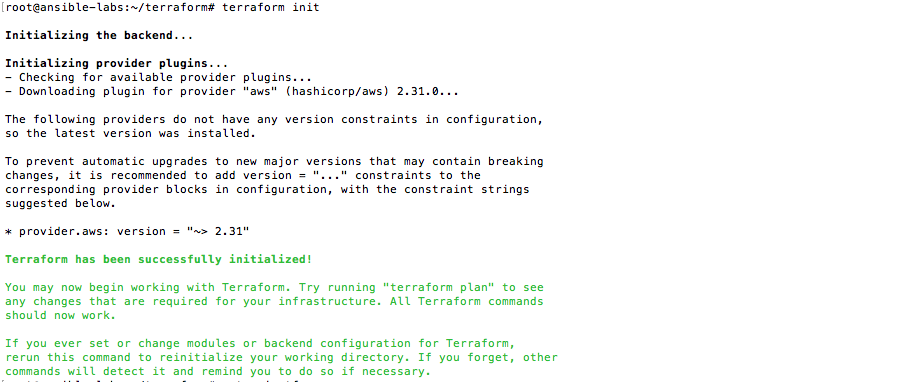
7. Then launch a terraform init to initialized the Terraform working directory. By that, I mean that it will download the AWS plugin. You should found a similar type of output from your screen.
8. Before performing the actual change, you can use the terraform plan to understand what change has been established. The plus sign means what is going to be added and the minus sign means those that are going to be removed.
9. To create the instance use the terraform apply to create the instance. It will prompt you to type 'yes' to continue on with the creation.

10. If you go on the AWS EC2 console, you will notice that the resource has been created successfully.

11. Hey, it's not over yet! There are more things that need to be added for example the name of the instance. Let's called it Nginx-Server. Let's add the tags. Also, launch a terraform apply.
tags = {

    Name = "Nginx-Web"

 }
Adding User Data and Security groups
12. At this stage, I believed you must understand what is Terraform and how it works? To make the installation of Nginx add the following block of lines:
user_data = <<-EOF

  #!/bin/bash

  yum install nginx -y

  systemctl start nginx

  systemctl enable nginx

  EOF
13. To add the security groups, enter these codes:
resource "aws_security_group" "allow_http" {

  name        = "allow_http"

  description = "Allow HTTP inbound traffic"

  ingress {

    from_port   = 80

    to_port     = 80

    protocol    = "tcp"

    cidr_blocks = ["0.0.0.0/0"]

  }
14. In part 6 under instance_type, I have added this line. What it means? "aws_security_group" is a resource, "allow_http" is a variable that has been called from the security group in part 13, and lastly "id" is the attribute.
vpc_security_group_ids = ["${aws_security_group.allow_http.id}"]
15. Note that when launching terraform apply, you will notice that Terraform will destroy the old machine and build a new one which implies that there will be a downtime.
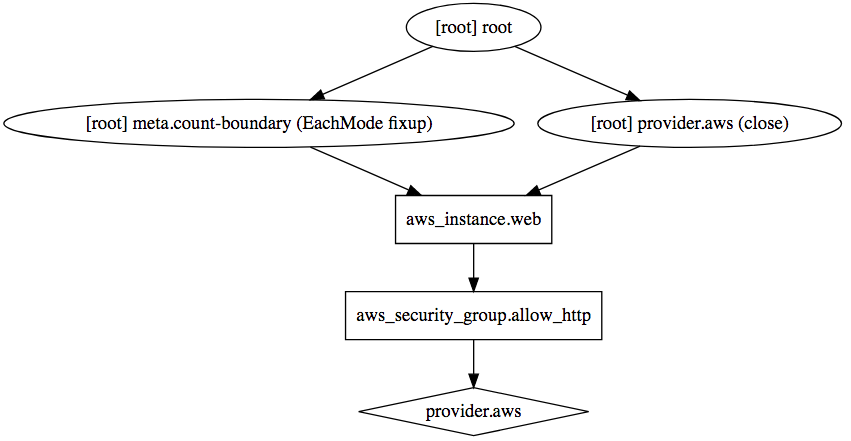
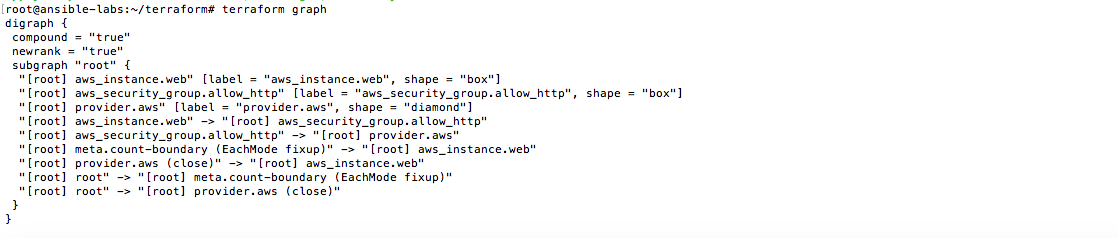
16. You can also view your code through a graph. Launch the command terraform graph. The output can also be viewed as more human-readable through Graphviz which you have to install. You can also go to webgraphviz.com to view it online.
It is very interesting to understand the dependency when using declarative language in Terraform. The full code can be viewed here on my Github Repository.