
Building miniature virtual labs on Virtualbox are most of the time fascinating especially when you have to troubleshoot between the virtual servers within a network environment, however, there are usually bugs that I have to deal with. The difference between NATNETWORK and that of NAT on VirtualBox differs differently to what I have noticed, this can be seen on the official website documentation.
However, I have noticed that in both situations, you are provided with a virtual router within VirtualBox. In the case of a NAT network, you are NOT allowed to ping between two VMs on NAT network unless you have established a tunnel whereas in the option of the NATNETWORK, this allows you to choose to dynamically range of IPs through the DHCP functionality on VirtualBox and you are also allowed to ping the outside world as well as other VMs on NATNETWORK. I have noticed that this work only on the new version compared to old ones where the NAT and NATNETWORK work almost the same way. There are still many discrepancies if ‘NatNetwork’ is the real name that should have been set!!
I have install Centos [minimum install] on my first lab. Here are the procedures for building the webserver.
- yum install httpd wget mysql-server php php-mysql php-gd nmap traceroute w3m vim
- wget https://wordpress.com/latest.tar.gz
- tar -xzf latest.tar.gz && cp -r wordpress /var/www
- chown -R apache:apache /var/www/wordpress
- vi /etc/httpd/conf.d/myweb.conf
create the vhost with the following values
-
- <VirtualHost *:80>
-
- DocumentRoot /var/www/wordpress
-
- ServerName www.myweb.com
-
- ServerAlias myweb.com
- <DIrectory /var/www/wordpress>
- Options FollowSymlinks
- Allow from all
- </Directory>
- ErrorLog /var/log/httpd/wordpress-error-log
- CustomLog /var/log/httpd/wordpress-access-log common
- </VirtualHost>
- mysql -u root -p [mysqld service should be started first]
- CREATE DATABASE mydb;
- CREATE USER myuser@localhost;
- SET PASSWORD FOR myuser@localhost= PASSWORD (“mypassword”);
- GRANT ALL PRIVILEGES ON mydb.* TO myuser@localhost IDENTIFIED BY ‘mypassword’;
- FLUSH PRIVILEGES;
- mv /var/www/wordpress/wp-sample-config.php wp-config.php
- Vi wp-config.php and modify username, dbname, password and hostname
- vi /etc/hosts and enter myweb.com to run as localhost
- Service httpd start // service httpd graceful // service mysqld start
- w3m www.myweb.com register on wordpress. Website up
- For ssl activation [https] do this yum install openssl mod_ssl
- openssl genrsa -out ca.key 2048 [to generate a signed certificate]
- openssl req -new -key ca.key -out ca.csr [to generate the .csr]
- openssl x509 -req -days 365 -in ca.csr -signkey ca.key -out ca.crt [generate a self-signed key]
- cp ca.crt /etc/pki/tls/certs
- cp ca.key /etc/pki/tls/private/ca.key
- cp ca.csr /etc/pki/tls/private/ca.csr
- vi /etc/httpd/conf.d/myweb.conf and add another vhost with the following values
- <VirtualHost *:443>
- SSLEngine on
- SSLCertificateFile /etc/pki/tls/certs/ca.crt
- SSLCertificateKeyFile /etc/pki/tls/private/ca.key
- DocumentRoot /var/www/wordpress
- ServerName www.myweb.com
- ServerAlias myweb.com
- <DIrectory /var/www/wordpress>
- Options FollowSymlinks
- Allow from all
- </Directory>
- ErrorLog /var/log/httpd/wordpress-error-log
- CustomLog /var/log/httpd/wordpress-access-log common
- </VirtualHost>
- Service httpd graceful and website up on https
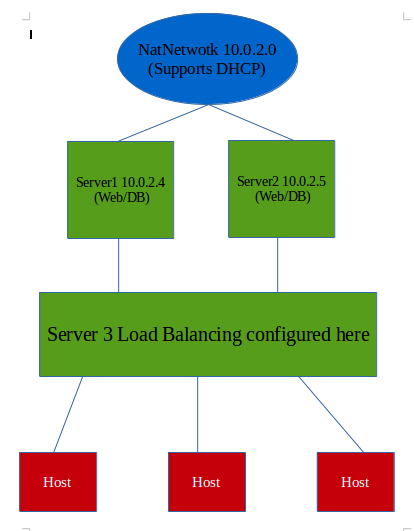
To make the website accessible on any hosts on the same NAT Network, edit /etc/resolv.conf with IP Address 10.0.2.4 myweb.com

Now that two servers are configured the same way, you can add another server as load Balancing to access the servers behind the load balancer. What is most interesting is that end users (hosts) will know only the load balancing server. I have achieved this by installing Pound on the server use as Load Balancing. This means that end users [hosts] will access the load balancing server which will, in turn, decides upon master/slave priorities. Pound converts server3 to a reverse proxy load balancing server. The aim is to make HTTP/S request from the hosts and request server 1/2 according to the configuration.
Based on this article a new Bash project is actually being brewed on Github to automate the installation of Wordpress, Apache, MySQL and all the application specified. This project should enable anyone to deploy a website through the script.