Zerto Ltd is a company providing disaster recovery software for virtualized infrastructure and the cloud. The product is based on 'hypervisor-based replication', a technology that moves asynchronous replication from the physical storage and disk arrays to the virtualization abstraction layer. This allows for storage-agnostic replication; i.e., a virtual machine ("VM") can be replicated to another VM operating on a different storage technology. - Wikipedia
An another technology which i keep on discovering in DRAAS - Disaster Recovery as a Service. Zerto also provides online certification for beginners and advanced professionals. The ZCP Basic is on the interesting course to start with. The first module is the "Getting Started with ZVR". I am going to shed a quick overview of the first module. The aim of the ZCP Basic is to:
- Install Zerto Virtual Replication 5.0
- Navigate the Zerto Virtual Manager
- Add VRAs and configure your sites
- Set up protection with VPGs and the journal
- Recover data and applications with any of the six key recovery operations
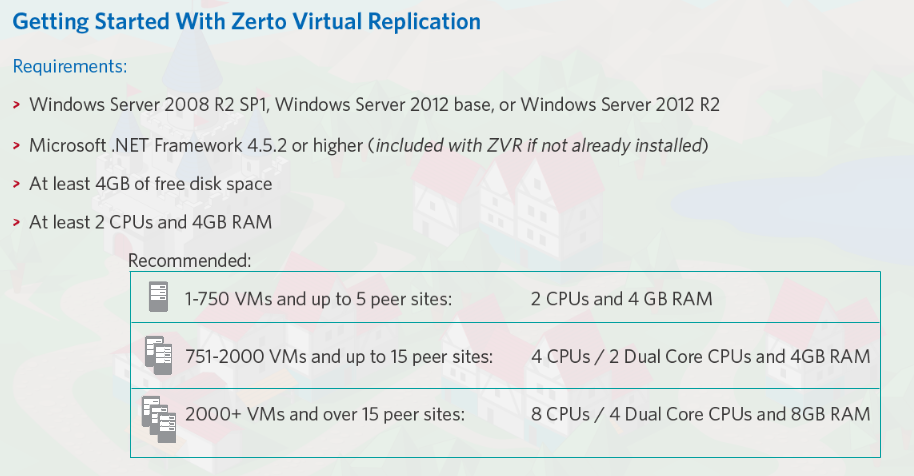
ZCP Basic is designed to get you up and running with ZVR and its key features and functions. There is a minimum requirements before using the ZVR service. First the ZVM should meet a requirement which is as follows. You will need one ZVM for every ZVM management console. For example each vCenter in use in the case of VMware, a ZVM is needed.
[caption id="attachment_1842" align="aligncenter" width="914"]
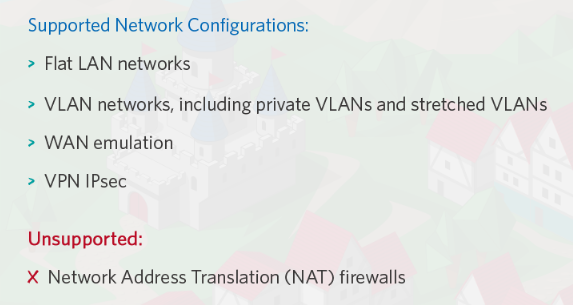
Zerto supports a variety of network configurations but not a NAT firewalling system.
[caption id="attachment_1843" align="aligncenter" width="573"]
To start with Zerto Virtual Replication, the Zerto Virtual Replication 5.0 Installer should be run as an administrator. The Zerto Virtual Replication 5.0 Installer will also install
- ZVM - Zerto Virtual Manager - A window service that manages disaster recovery
- VRA - Virtual Replication Appliance OVF: A virtual machine that manages replication of data to the recovery site.
- VBA - Virtual Backup Appliance: A Windows service that manages backups
- ZUI - Zerto User Interface : The graphical user interface
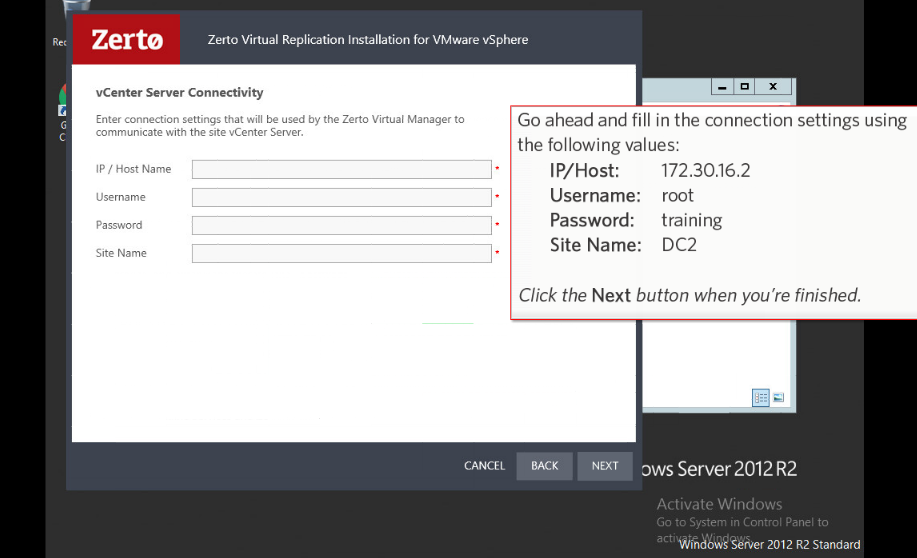
There are two types of installation i.e; Express installation and Custom Installation. The express installation will consist all configurations and packages by default whereas, the custom installation will allows you to specify values such as ports and connection details. During installation, it will prompt for the IP/Host Name, Username, Password and Site Name. The IP is related to the vCenter server IP address.
[caption id="attachment_1844" align="alignnone" width="917"]
After inserting the information ZVR will validate the information. There are 4 reasons why it might not validate:
- vCenter Server is not running
- Can't connect over correct ports - 443 for vCenter
- Incorrect access credentials
- User might not be an administrator
Now that the ZVR is installed, you can access the ZVM from any modern HTML5 compatible browser with the URL https://ZVM IP ADDRESS:9669. If the URL cannot be accessed, the following should be checked:
- The VM is powered on and functioning
- If using a proxy server, ensure the ZVM IP is whitelisted
- Prefaced with HTTPS not HTTP
- Added :9669 after the IP address

