
After a little introduction about LVM from the article Managing LVM with PVMOVE - Part 1, its time to get into the details of the pvmove command. Based on the scenario and constraints described in part 1, that I will elaborate on the pvmove operation here.

Before handling any operation, do your precheck tasks such as verification of the state of the server, URLs, services and application running, the port they are listening etc.. This is done to be able to handle complicated tasks both at the system and application level. However, in respect of the pvmove operation, I would recommend you to fire the vgs, pvs and lvs commands as well as a fdisk -l to check for the physical disk state. Do a df -h and if possible; an lsblk to list all blocks for future references. On CentOS / RedHat you need to install the package util-linux to be able to use lsblk which is very interesting.

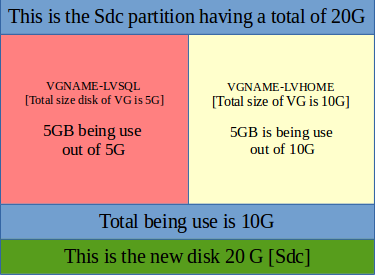
Let us say we have a disk of 100G [lets called it sdb] and we have to replace it with another disk of 20G [sdc]. We assume that there is 10G of data being used out of the 100G hard disk which looks reasonable and possible to be handled by the 20G hard disk that we have planned to shift to. On our Sdb we have 2 LV lets call it lvsql that is being used by MySQL having the database there and lvhome handling the rest of the server applications. See illustration from the diagram on the right. Both LVs are found in the same VG called VGNAME.

So you might ask yourself how come if you perform a df -h on your machine you find that lvsql total size is 15G and that of lvhome is 80G making a total of 95G when the hard disk is a 100G [As described on the diagram above]. Is there 5G missing? The answer is no. When you fire the command pvdisplay, you will notice that the "PE Size" had consumed 5 GB. For example on this screenshot on the left, the PE Size is 4MB.
Usually, the 5Gb missing will be allocated there which means that the PE Size is used for a specific purpose for example in our situation a back up of the MySQL database or other processes. If the missing size is not found it means that it's still in the VG and has not been allocated to the LV. It's important to allocate some additional space there. So before start do a pvdisplay, lvdisplay, and vgdisplay as well which are important. We now have our sde hard disk as described in this picture below.
How to start? It's up to you to decide which lv you want to allocate more space as you have control over the vg. You can also add another physical disk and extend the vgname and resize the lvsql since a database usually grows in size.
Do your pre-check tasks as described.- Stop all applications running such as MySQL and Atop in our case. You can use the lsof command to check if there are still processes and application writing on the disk.
- Once all applications have been stopped you can type the mount command to check the presence of the partitions as well as you have to confirm that there is no application writing on the disk - use lsof or fuser.
- Comment the two lines related to the 2 vg partitions in the /etc/fstab file. Usually it would be the lines /dev/vgname/lvsql and /dev/vgname/lvhome. You can now umount the disk.
- You would notice that it would not be possible to umount the partitions if ever an application is writing on it. Another issue is that if you have ssh running on the machine, you need to stop it! Then, how do you ssh on the machine? Use the console from vSphere or if it's a physical machine boot it with a live cd.
- Next step is to do a lvreduce of the lv if possible according to the size. In our case 5GB being used out of 80. Do a lvreduce -L 7GB --resizefs /dev/vgname/lvhome. This is done because when you will move the pv it will be faster. The bigger the lv the more time it takes.
- Once all lv size has been reduced to the maximum, add the disk sdc. Make sure it gets detected if you are on VMware. Use the fdisk command to check and compare from your precheck test.
- Now create from the sdc a pv The command is pvcreate /dev/sdc. This means that you created a pv from the disk you have added.
- After the pv has been created extend the vg called vgname from the old disk (sdb) by using the disk sdc which you just added to the same old vg called vgname. Command is vgextend vgname /dev/sdc
- Now the magic starts, fire a pvmove /dev/sdb /dev/sdc - This means that you are moving the pv allocated to the vgname belonging to the PEs of hard disk sdb into sdc.
- When the pvmove is completed, you just need to do a vgreduce vgname /dev/sdb. When you launch the vgreduce it will throw out the old disk out from the VG as you have reduced it completely. You can now remove the old disk.
- Since you have reduced the lvhome you will notice that lvhome is at 7GB instead of 10G as we have reduced size in step 4 to accelerate the pvmove process. The step is to lvresize -l +100%FREE /dev/vgname/lvhome. You will notice that the PE Size is intact as we had not resized the lvsql.
- You can now do a /sbin/resize2fs /dev/vgname/lvhome. Uncomment back the lines on fstab, mount -av and restart your applications.