Ansible is on open source IT orchestration engine that manages on-premise and in the cloud remote devices in a coordinated fashion. These are servers, networking hardware, and storage devices. Ansible can be used to talk to typical load balances, firewalls switches or any Linux machines. Continuous deployment in any environment is important as to whether the tools are predictable. Undefined behavior should be taken into consideration. Ansible is a human-readable playbook format. There is a minimum jargon in the system.

How Ansible is different compared to Puppet and Chef?
Compared to Puppet or Chef which need to have an agent installed on remote machines and the controller on the main server, but, with Ansible, you do not need to install anything on the remote machine as it relies on SSH connection and a simple push mechanism. On the other side, Puppet and Chef would use a Pull mechanism.
Let's deploy Ansible
You would normally find lots of pretty documentation on the official website. If you want to adventure a bit around Ansible here are some tips to get started on a Centos 6 machine. I have created 2 machines called ansible1 and ansible2. Each can ping each other and Port 22 - SSH is listening. There are several dependencies needed to install Ansible. I would advise you to edit the /etc/hosts file and point the IP on the hostname if you do not have any DNS.
On ansible1, simply enable the epel repo and do a yum install ansible. However, you can also compile from source. Different Python version would be required. Those are usually the packages needed:
PyYAML
 libyaml
 python-babel
 python-crypto
 python-crypto2.6
 python-httplib2
 python-jinja2
 python-keyczar noarch
 python-paramiko noarch
 python-pyasn1 noarch
 python-simplejson i686
 sshpass
Once Ansible is installed on the machine ansible1, even if more machines are connected on the same network, you would not need to install it anything. To make ansible2 part of the ansible1 network, an inventory file need to be configured. This is located at /etc/ansible/hosts
Add the following block in the /etc/ansible/hosts file
[myservers]
ansible1
ansible2
Try testing a ping
After adding the block as mentioned above, you carry out a simple test to check for ping via the ansible command.
ansible ansible2 -m ping -u root -k
Here is the result.

You might want to set up root password. This can be set up with the command :
ansible ansible2 -m setup -u root -k
Setting up your SSH Key
However, you might want to set up Ansible with a ssh key.
On ansible1, simply create a key with the command ssh-keygen and/or if already got your key send it to the ansible2 using the following commands ssh-copy-id -i ansible2. Also repeat same steps on ansible2 by sending your key to ansible1. The file located at ~/.ssh/authorized_keys would contain the keys. As from here you simply run any command without being prompt each time to enter password.

More funs with commands
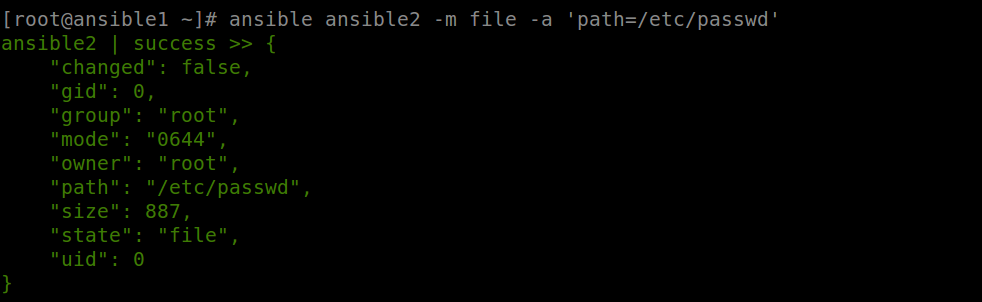
Let's say we want to have an information about the /etc/passwd file from the ansible2 server. We simply need to fire this command
ansible ansible2 -m file -a 'path=/etc/passwd'
I can also create a directory with Ansible in any directory i want and even setup the user and group permission. For example to create a directory in the /tmp.
ansible ansible2 -m file -a 'path=/tmp/hackers_mauritius state=directory mode=777 owner=root'

Errors that can be encountered
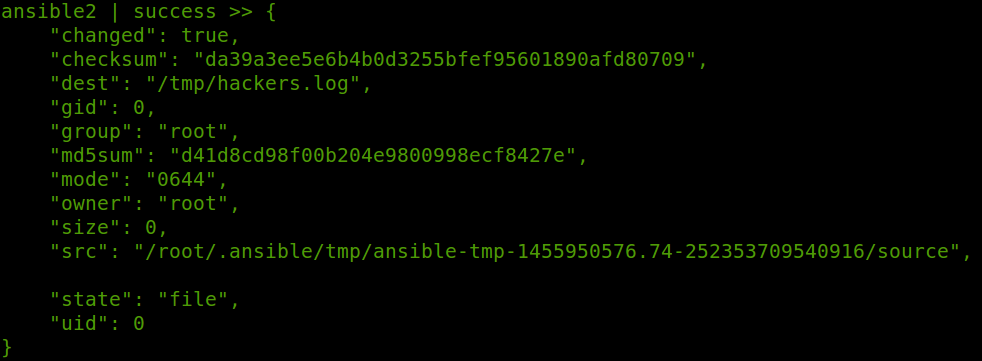
However, its very important you test your command before setting it up on production environment. Errors can also be encountered if dependencies packages are not installed. For example let's send a file from ansible1 to ansible2. The command is
ansible ansible2 -m copy -a 'src=/root/hackers.log dest=/tmp'

You might noticed that SELINUX can be disabled or simply set the parameter in the /etc/selinux/config. I have disabled selinux and rebooted the machine. Here is the output