
As we have seen last time, Ansible is really cool especially for automation. In the blog post Getting started with Ansible i have share the following points:
- Basic deployment of Ansible on 2 virtual machines
- Dependencies that are usually needed
- Setting up the SSH key
- Some basic commands like ping, copy, transfer etc..
- Errors that may be encountered due to dependency and SELINUX

Lets see how to delete a specific file
ansible ansible2 -m file -a 'path=/tmp/hackers.log state=absent'

However, you easily grasp all those modules names to delete, add etc.. with the ansible-doc -l command. If you want a more detailed information, say for example the copy module which i have used in the last Ansible blog post, we can just use the ansible-doc copy command. Cool isn't it?
I will now lay some more emphasis on Ansible Playbooks. Playbooks are Ansible’s configuration, deployment, and orchestration language. They can describe a policy you want your remote systems to enforce, or a set of steps in a general IT process. - Ansible. Compared to Puppet there are odules and in Chef, we have Cookbooks, same thing apply for Ansible where we have a Playbook. These playbooks are written in YAML, which is human friendly data serialization standards for all programming languages. Playbooks are divided into three sections, that is Target ,Variable and Tasks sections :
- Target section (similar to nodes.pp in Puppet and run-list in Chef), The target section simply defines in which host playbooks will be executed.
- Variable section - This will comprise of all variables which can be used in the Playbooks
- Tasks section - This is a list of all the modules that is going to run and in which particular order.
Before getting further deep into Ansible Playbooks, its very important to know that indentation and spacing are very important. So, get into /etc/ansible and create a .yml file there. I created a file1.yml as follows:
- - -
   -  hosts: ansible2
       user: root
       vars:
        motd_welcome: 'Welcome to hackers Mauritius'
       tasks:
       - name: sample motd
       copy:
        dest: /etc/motd
        content: "{{ motd_welcome }}"
Explanation of the file1.yml
- The hosts in the file1.yml means in which target the task is going to be applied.
- The user is pretty straight forward denoting with which user same is going to be executed
- Vars here is where the variable section
- motd_welcome is a variable defined under the vars section having the value 'Welcome to hackers Mauritius'
- tasks is where the task section starts
- copy is the task that you want to do
- dest is the destination where you want to copy
- content is "{{ motd_welcome }}" which is reference in the vars section.
Execute this file with the command ansible-playbook test1.yml
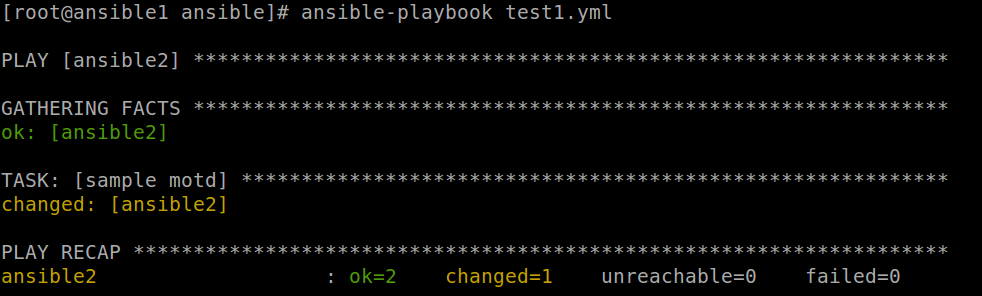
The MOTD is now created on the ansible2 machine :)
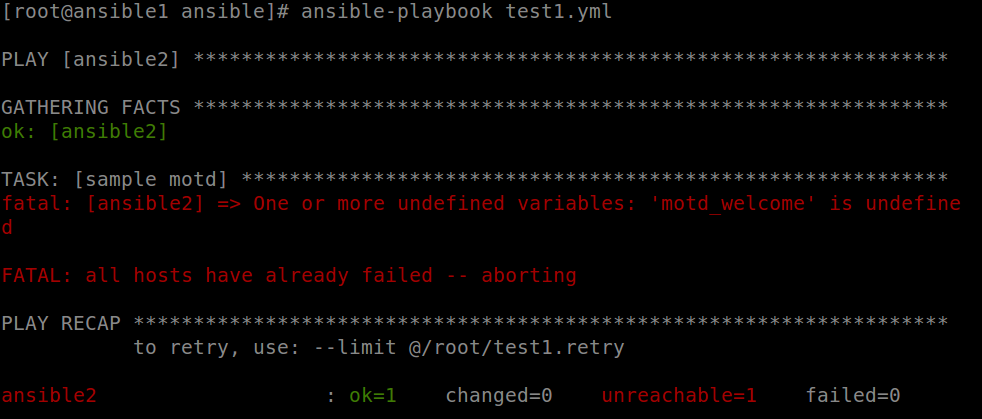
If there were a syntax error, you might have encountered errors as such where the motd_welcome variables is wrongly set up.
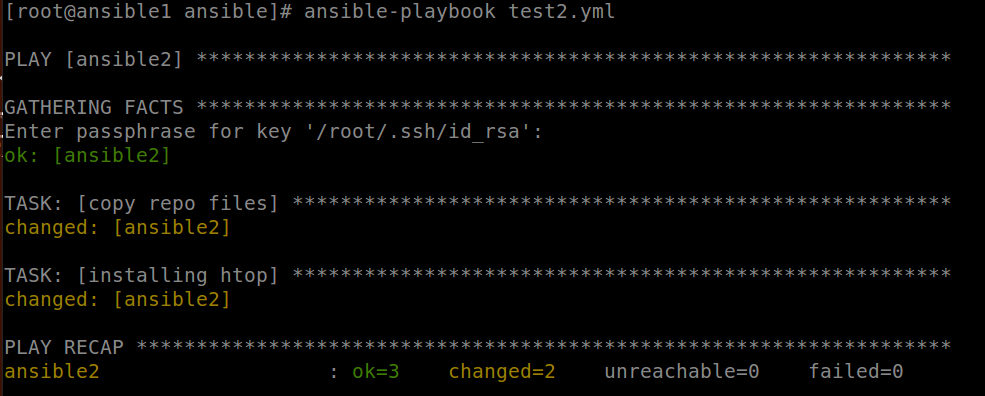
Let's take another example by creating a playbook for installing htop by creating test2.yml
- - -
   - hosts: ansible2
      user: root
      tasks:
       - name: copy repo files
          copy: src=files/epel.repo dest=/etc/yum.repos.d/epel.repo
       - name: installing htop
          action: yum name=htop state=installed
So, we can clearly see that the actions will be carried out on the ansible2 server with user root for the task to copy the file epel.repo to the repo of ansible2 following which the installation of htop will be carried out. I have also created a directory in /etc/ansible/files and a file called epel.repo which have the necessary configurations.
Another interesting stuff is that with Ansible, you have the flexibility of setting up several actions and at the time you are executing the .yml file you can for example use the command ansible-playbook -v test2.yml -- step which will prompt you each time for a yes/no answer.