
This article will explain all the necessary configurations to set up a simple Master-Slave replication on MariaDB. I have tested it on CentOS7. More articles on MariaDB optimization, Master-Master replication, and Galera cluster are coming up soon. Well, I was introduced to MariaDB in the year 2014 by Joffrey Michaie of SkySQL at Flying Dodo video conference room, Bagatelle, Mauritius during a LUGM [Linux User Group of Mauritius] meet up. You can still view out the video on the LUGM Youtube Channel.
What is MariaDB? "MariaDB is a community-developed fork of the MySQL relational database management system intended to remain free under the GNU GPL. Being a fork of a leading open source software system, it is notable for being led by the original developers of MySQL, who forked it due to concerns over its acquisition by Oracle. " - Wikipedia.
[caption id="attachment_464" align="alignleft" width="367"]I have set up 2 Centos 7 Labs; one as Master and the other as Slave.
You will need to install MariaDB on both servers to start with.
Make sure port 3306 is opened to enable replication.
Since the test is based on 2 Virtual Box labs, I have temporarily disabled IPtables.
At the time I am writing this article, the latest version is 10.1.8-stable.
You can easily download MariaDB through the repository configuration tool
1. After having installed a fresh MariaDB on both virtual machines - Master / Slave, you will need to configure the root access to MySQL by using the following command. It will prompt you to enter a password which is a blank password by default. Then, you will have to enter a password for root which will prompt you to remove anonymous users, disallow root login, remove the test database and access to it and reloading privilege tables. Just press 'Y' by following the command below:
mysql_secure_installation
2. After setting up the root user of MySQL, you can test it with a fake or no password to ensure the root password has been set up effectively. Next step, is to create a database with some tables in it or simply import a database. I created a table in the database called 'employees' on the Master.
create database employees;
use employees;
create table profile (name char(30), age int(2), address varchar(40)) ;
3. So, a database has been created on the Master. We will now edit the /etc/my.cnf on the master and under the [mysqld] enter the following:
server-id=1
log-bin = mysql-bin
4. Next step, is to create a user for replication purpose to the slave server (The command need to be launched on the master server). The IP 192.168.1.8 is the slave server. Once the grant replication is launched the user repliuser will be created automatically. Afterward, launch the command flush privileges so that the server noticed these changes to load the grant tables into memory.
MariaDB [(none)]>
grant replication slave on *.* to repliuser@'192.168.1.8' identified by 'replipassword';
MariaDB [(none)]>
flush privileges;
5. At this point, if you launch a show master status; on the master server you will have a prompt "Empty set". To enable the master, we need to restart MariaDB. As we want to replicate this master database on the slave server, we need to stop mysql to continue writing on the table.
MariaDB [(none)]>
flush tables with read lock;
systemctl restart mariadb
6. Connect back to MariaDB and launched a show master status\G You will need to find a result similar to this screenshot.
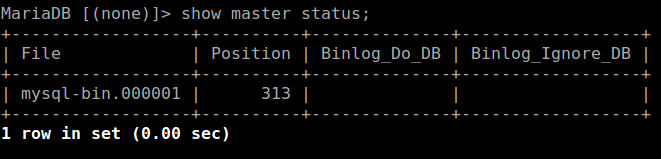
7. We now have a file name and a position. These two values will be used to set up the slave database. Do a MySQL dump on the master database and import it to the slave server (I copied it from master to slave on the /home folder).
On the Master server:
[root@master ~]#
mysqldump -u root -p employees > employees.sql
[root@master ~]#
scp employees.sql [email protected]:/home
8. Now, we log in to the slave server. Create database employees just as in the master server and import the database employees to the slave database server.
[root@slave home]#
mysql -u root -p employees < employees.sql
9. Edit the /etc/my.cnf in the slave server and enter the following. Note the value of the server-id should be greater than that of the master server, otherwise, it may not work. Then restart MariaDB on the slave server.
server-id = 2
systemctl restart mariadb
10. Right now, the slave server cannot identify the master-slave to synchronize the database for replication.
On the master server:
unlock tables;
On the slave server:
MariaDB [(none)]>
change master to master_host='master', master_user='repliuser', master_password='replipassword', master_log_file='mysql-bin.000001', master_log_pos=313;
11. You can now start the slave replication. Afterward, you can type a show slave status\G;
start slave;
[caption id="attachment_470" align="alignleft" width="391"]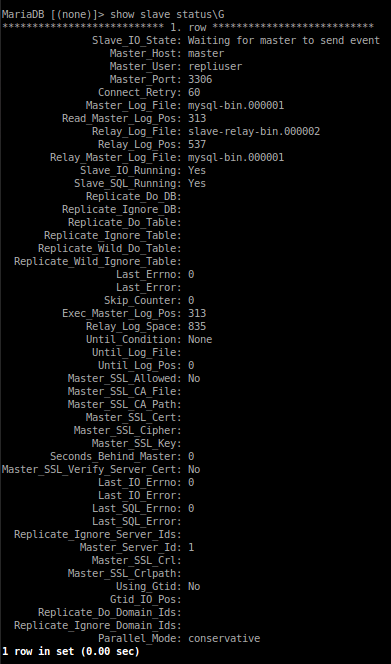
Tips:
-
- To find the list of services for which specific ports can be opened, use the command firewall-cmd --get-services. Hence, you can add the MySQL service with the command firewall-cmd --permanent --add-service-mysql. After adding the MySQL service you will need to reload the firewall service with the command firewall-cmd reload. To verify if certain rules have been loaded in the firewall use the command firewall-cmd --list-all
- To check which database you have, you can fire the command show schemas;
- At step 9, If you want to replicate a specific database on the slave server, you can use the following parameter in the /etc/my.cnf in the slave under [mysqld] use replicate-wild-do-table=employees.% where the .% means all tables under the database employees.
- Since you will be on Virtual Box or Vmware, you may need to edit your /etc/hosts so that each server recognized each other as the Master_User and Slave_User respectively. In this case, in the /etc/hosts for the master enter the IP of the slave server followed by the hostname of the slave and vice versa. Test it with a ping. In my case, if I ping master from the slave, it will answer promptly.