
Stunnel is a program by Michal Trojnara that allows you to encrypt arbitrary TCP connections inside SSL. Stunnel can also allow you to secure non-SSL aware daemons and protocols (like POP, IMAP, LDAP, etc) by having Stunnel provide the encryption, requiring no changes to the daemon's code. It is a proxy designed to add TLS encryption functionality to existing clients and servers without any changes in the programs' code. Its architecture is optimized for security, portability, and scalability (including load-balancing), making it suitable for large deployments. - Stunnel.org
The concept that lies behind Stunnel is about the encryption methodology that is used when the client is sending a message to a server using a secure tunnel. In this article, we will focus on using MySQL alongside Stunnel. MariaDB Client will access the MariaDB server database using the Stunnel for more security and robustness.
[caption id="attachment_2279" align="alignnone" width="1150"]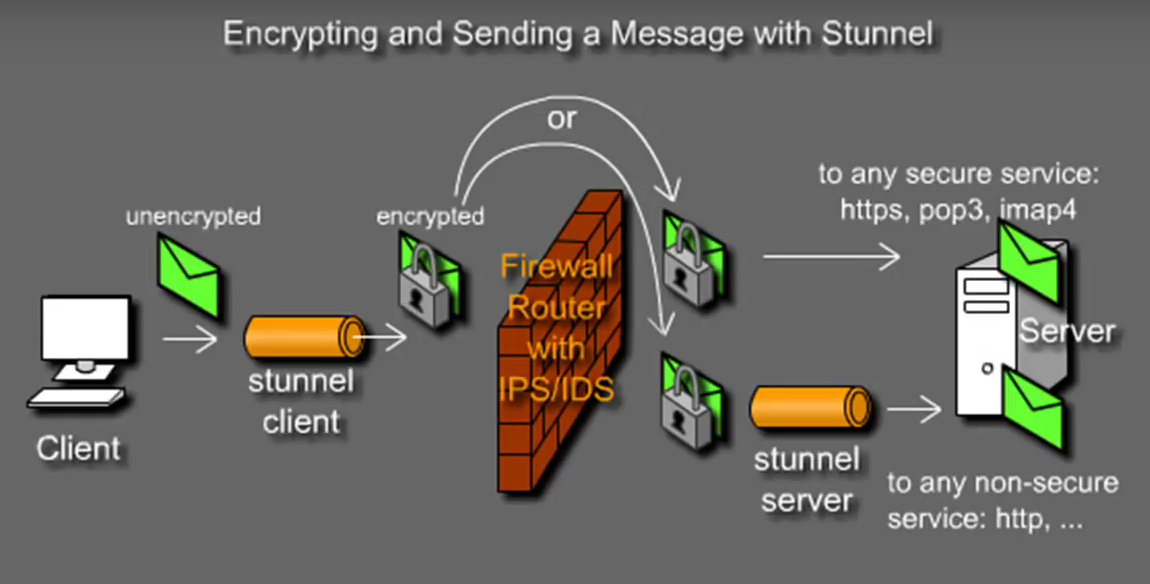
I will demonstrate the installation and configuration using the CentOS distribution which is on my Virtual Box lab environment. I created two CentOS 7 virtual machines with hostname as stunnelserver and stunnelclient. We will tunnel the MySQL traffic via Stunnel. You can apply the same concept for SSH, Telnet, POP, IMAP or any TCP connection.
The two machines created are as follows:
- stunnelserver : 192.168.100.17 - Used as the Server
- stunnelclient : 192.168.100.18 - Used as the Client
Basic package installation and configuration on both servers
1. Install the Stunnel and OpenSSL package on both the client and the server.
yum install stunnel openssl -y
2. As we will be using Stunnel over MariaDB, you can use the MariaDB repository tools to get the links to download the repository. Make sure you have the MariaDB-client package installed on the stunnelclient which will be used as client to connect to the server. Also, install both packages on the stunnelserver. The commands to install the MariaDB packages are as follows:
sudo yum install MariaDB-server MariaDB-client
3. For more information about installations of MariaDB, Galera etc, refer to these links:
MariaDB Master/Master installation
MariaDB Master/Slave installation
Configuration to be carried out on the stunnelserver (192.168.100.17) 4. Once you have all the packages installed, it's time to create your privatekey.pem. Then, use the private key to create the certificate.pem. Whilst creating the certificate.pem, it will prompt you to enter some details. Feel free to fill it.openssl genrsa -out privatekey.pem 2048
openssl req -new -x509 -days 365 -key privatekey.pem -out certificate.pem
5. Now comes the most interesting part to configure the stunnel.conf file by tunnelling it to the MySQL port on the stunnelserver. I observed that the package by default does not come with a stunnel.conf or even a Init script after installing it from the repository. So, you can create your own Init script. Here is my /etc/stunnel/stunnel.conf on the server:
chroot = /var/run/stunnel
setuid = stunnel
setgid = stunnel
pid = /stunnel.pid
debug = 7
output = /stunnel.log
sslVersion = TLSv1
[mysql]
key = /etc/stunnel/privatekey.pem
cert = /etc/stunnel/certificate.pem
accept = 44323
connect = 127.0.0.1:3306
6. Position your privatekey.pem and certificate.pem at /etc/stunnel directory. Make sure you have the right permission (400) on the privatekey.pem.
7. Based upon the configuration in part 5, we will now create the /var/run/stunnel directory and assign it with user and group of stunnel:
useradd -G stunnel stunnel && mkdir /var/run/stunnel && chown stunnel:stunnel /var/run/stunnel
8. The port 44323 is a non reserved port which I chose to tunnel the traffic from the client.
9. As we do not have the Init script by default in the package, start the service as follows:
stunnel /etc/stunnel/stunnel.conf
10. A netstat or ss command on the server will show the Stunnel listening on port 44323.
Configuration to be carried out on the stunnelclient (192.168.100.18)
11. Here is the stunnel.conf file on the stunnel client :
verify = 2
chroot = /var/run/stunnel
setuid = stunnel
setgid = stunnel
pid = /stunnel.pid
CAfile = /etc/stunnel/certificate.pem
client = yes
sslVersion = TLSv1
renegotiation = no
[mysql]
accept = 24
connect = 192.168.100.17:44323
12. Import the certificate.pem in the /etc/stunnel/ directory.
scp <user>@<ipofstunnelserver>:/etc/stunnel/certificate.pem
13. Based upon the configuration in part 11, we will now create the /var/run/stunnel directory and assign it with user and group of stunnel:
useradd -G stunnel stunnel && mkdir /var/run/stunnel && chown stunnel:stunnel /var/run/stunnel
14. You can now start the service on the client as follows:
stunnel /etc/stunnel/stunnel.conf
15. A netstat on the client will show the Stunnel listening on port 24.
16. You can now connect on the MySQL database from your client to your server through the tunnel. Example:mysql -h 127.0.0.1 -u <Name of Database> -p -P 24
Tips:
- When starting Stunnel, the log and the pid file will be created automatically inside the jail environment that is /var/run/stunnel.
- You can also change the debug log level. Level is a one of the syslog level names or numbers emerged (0), alert (1), crit (2), err (3), warning (4), notice (5), info (6), or debug (7). All logs for the specified level and all levels numerically less than it will be shown. Use debug = debug or debug = 7 for greatest debugging output. The default is notice (5).
- If you compile from source, you will have a free log rotate and Init scripts. Probably on CentOS, it's not packaged with the script!
- You can also verify if SSLv2 and SSLv3 have been disabled using openssl s_client -connect 127.0.0.1:44323 -ssl3 and try with -tls1 to compare.
- For the purpose of testing, you might need to check your firewall rules and SELINUX parameters.
- You don't need MariaDB-Server package on the client.
- Stunnel is running on a Jail environment. The logs and the PID described in part 5 and 11 will be found in /var/run/stunnel.
- You can invoke stunnel from
inetd. Inetd is the Unix 'super server' that allows you to launch a program (for example the telnet daemon) whenever a connection is established to a specified port. See the "Stunnel how's to" for more information. The Stunnel manual can also be viewed here.