
Auditing a Linux System is one of the most important aspect when it comes to security. After deploying a simple Centos 7 Linux machine on virtual box, I made an audit using Lynis. It is amazing how many tiny flaws can be seen right from the beginning of a fresh installation. Lynis Enterprise performs security scanning for Linux, macOS, and Unix systems. It helps you discover and solve issues quickly, so you can focus on your business and projects again. - Cisofy.
[caption id="attachment_2495" align="aligncenter" width="685"]
Introduction
The Lynis tool performs both security and compliance auditing. It has a free and paid version which comes very handy especially if you are on a business environment. The installation of the Lynis tool is pretty simple. You can install it through the Linux repository itself, download the tar file or clone it directly from Github.
Scanning Performed by Lynis
1. I downloaded the tar file with the following command:
wget https://cisofy.com/files/lynis-2.6.0.tar.gz
2. Then, just untar the file and get into it
tar -xzf lynis-2.6.0.tar.gz && cd lynis
3. Once into the untar directory, launch the following command:
./lynis audit system --quick
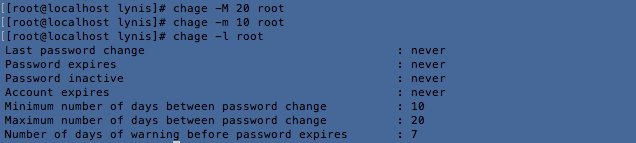
Configure minimum password age in /etc/login.defs [AUTH-9286]
Configure maximum password age in /etc/login.defs [AUTH-9286]
chage -l

2. Use chage -m root to set the minimum password age and chage -M root to set maximum password age:
3. Delete accounts which are no longer used [AUTH-9288]
It is also suggested to delete accounts which are no longer in use. This suggestion was prompted as I created a user "nitin" account during installation and did not use it yet. For the purpose of this blog, I deleted it using userdel -r nitin
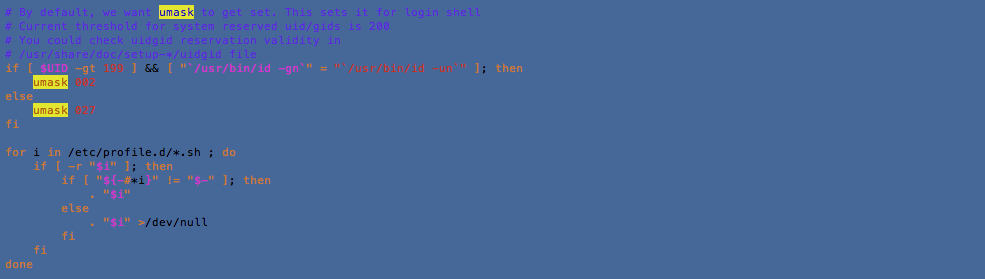
4. Default umask in /etc/profile or /etc/profile.d/custom.sh could be more strict (e.g. 027) [AUTH-9328]
Default umask values are taken from the information provided in the /etc/login.defs file for RHEL (Red Hat) based distros. Debian and Ubuntu Linux based system use /etc/deluser.conf. To change default umask value to 027 which is actually 022 by default, you will need to modify the /etc/profile script as follows:
5. To decrease the impact of a full /home file system, place /home on a separated partition [FILE-6310]
To decrease the impact of a full /tmp file system, place /tmp on a separated partition [FILE-6310]
To decrease the impact of a full /var file system, place /var on a separated partition [FILE-6310]
In the article Move your /home to another partition, you will have detailed explanations to sort out this issue.
6. Disable drivers like USB storage when not used, to prevent unauthorized storage or data theft [STRG-1840]
Disable drivers like firewire storage when not used, to prevent unauthorized storage or data theft [STRG-1846]
To disable USB and firewire storage drivers, add the following lines in /etc/modprobe.d/blacklist.conf then do a modprobe usb-storage && modprobe firewire-core
blacklist firewire-core
blacklist usb-storage
7. Split resolving between localhost and the hostname of the system [NAME-4406]
This issue is only about hostname and localhost in /etc/hosts which could confuse some applications installed on the machine. According to cisofy, for proper resolving, the entries of localhost and the local defined hostname, could be split. Using some middleware and some applications, resolving of the hostname to localhost, might confuse the software.
8. Install package 'yum-utils' for better consistency checking of the package database [PKGS-7384]
Consider running ARP monitoring software (arpwatch,arpon) [NETW-3032]
The yum-utils and arpwatch are nice tools to perform more debugging and verification. Install it using the following commands:
yum install yum-utils arpwatch -y
9. You are advised to hide the mail_name (option: smtpd_banner) from your postfix configuration. Use postconf -e or change your main.cf file (/etc/postfix/main.cf) [MAIL-8818]
You just have to uncomment the following line and lauch a postconf -e. However, since this is a fresh install, and I'm not using postfix, it is better to stop the service.

10. Check iptables rules to see which rules are currently not used [FIRE-4513]
Since, I'm not on a production environment, it is very difficult to identify unused iptables rules right now. Once on the production environment, this situation is different. According to Cisofy, the best way is to "use iptables --list --numeric --verbose to display all rules. Check for rules which didn't get a hit and repeat this process several times (e.g. in a few weeks). Finally remove any unneeded rules."
11. Consider hardening SSH configuration [SSH-7408]
- - Details : AllowTcpForwarding (YES --> NO)
- - Details : ClientAliveCountMax (3 --> 2)
- - Details : Compression (YES --> (DELAYED|NO))
- - Details : LogLevel (INFO --> VERBOSE)
- - Details : MaxAuthTries (6 --> 2)
- - Details : MaxSessions (10 --> 2)
- - Details : PermitRootLogin (YES --> NO)
- - Details : Port (22 --> )
- - Details : TCPKeepAlive (YES --> NO)
- - Details : UseDNS (YES --> NO)
- - Details : X11Forwarding (YES --> NO)
- - Details : AllowAgentForwarding (YES --> NO)
Again, hardening SSH is one of the most important to evade attacks especially from SSH bots. It all depends how your network infrastructure is configured and whether it is accessible from the internet or not. However, these details viewed are very informative.
12. Periodic system scan, malware and ransomware scanners are now a must. According to statistics, servers are being hacked constantly. Pervasive Monitoring is becoming a heavy cash deal for malicious softwares.
The Lynis Command
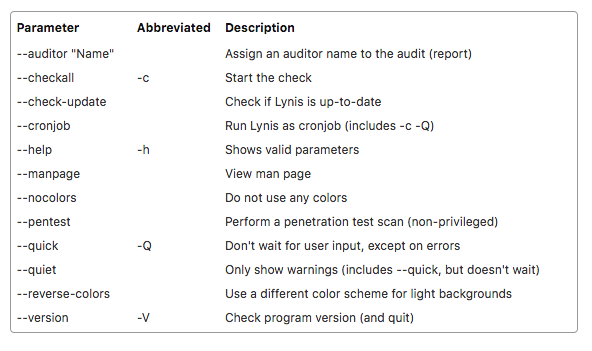
Lynis documentation is pretty straight forward with a cheat sheet. The arguments are self explicit. Here are some hints.
1.Performs a system audit which is the most common audit.
lynis audit system
2. Provides command to do a remote scan.
lynis audit system remote <host>
3. Views the settings of default profile.
lynis show settings
4. Checks if you are using most recent version of Lynis
lynis update info
5. More information about a specific test-id
lynis show details <test-id>
6. To scan whole system
lynix --check-all Q
7. To see all available parameters of Lynis
lynis show options
At the end of any Lynis command, it will also prompt you where the logs have been stored for your future references. It is usually in /var/log/lynis.log. The systutorial on lynis is also a good start to grasp the command. All common systems based on Unix/Linux are supported. Examples include Linux, AIX, *BSD, HP-UX, macOS and Solaris. For package management, the following tools are supported:- dpkg/apt, pacman, pkg_info, RPM, YUM, zypper.