
Building from scratch an agentless inventory system for Linux servers is a very time-consuming task. To have precise information about your server's inventory, Ansible comes to be very handy, especially if you are restricted to install an agent on the servers. However, there are some pieces of information that the Ansible's inventory mechanism cannot retrieve from the default inventory. In this case, a Playbook needs to be created to retrieve those pieces of information. Examples are VMware tool and other application versions which you might want to include in your inventory system. Since Ansible makes it easy to create JSON files, this can be easily manipulated for other interesting tasks, say an HTML static page. I would recommend Ansible-CMDB which is very handy for such conversion. The Ansible-CMDB allows you to create a pure HTML file based on the JSON file that was generated by Ansible. Ansible-CMDB is another amazing tool created by Ferry Boender.
[caption id="attachment_2851" align="aligncenter" width="401"]
Let's have a look how the agentless servers inventory with Ansible and Ansible-CMDB works. It's important to understand the prerequisites needed before installing Ansible. There are other articles which I published on Ansible:
- Some tips with Ansible for managing OS and applications
- Configure your LVM via Ansible
- Update GLIBC and restart BIND using Ansible
- Some fun with Ansible playbooks
- Getting started with Ansible deployment
Ansible Basics and Pre-requisites
1. In this article, you will get an overview of what Ansible inventory is capable of. Start by gathering the information that you will need for your inventory system. The goal is to make a plan first.
2. As explained in the article Getting started with Ansible deployment, you have to define a group and record the name of your servers(which can be resolved through the host file or DNS server) or IP's. Let's assume that the name of the group is "test".
3. Launch the following command to see a JSON output which will describe the inventory of the machine. As you may notice that Ansible had fetched all the data.
Ansible -m setup test
4. You can also append the output to a specific directory for future use with Ansible-cmdb. I would advise creating a specific directory (I created /home/Ansible-Workdesk) to prevent confusion where the file is appended.
Ansible-m setup --tree out/ test
5. At this point, you will have several files created in a tree format, i.e; specific file with the name of the server containing JSON information about the servers inventory.
Getting Hands-on with Ansible-cmdb
6. Now, you will have to install Ansible-cmdb which is pretty fast and easy. Do make sure that you follow all the requirements before installation:
git clone https://github.com/fboender/ansible-cmdb
cd ansible-cmdb && make install
7. To convert the JSON files into HTML, use the following command:
ansible-cmdb -t html_fancy_split out/
8. You should notice a directory called "cmdb" which contain some HTML files. Open the index.html and view your server inventory system.
Tweaking the default template
9. As mentioned previously, there is some information which is not available by default on the index.html template. You can tweak the /usr/local/lib/ansible-cmdb/ansiblecmdb/data/tpl/html_fancy_defs.html page and add more content, for example, 'uptime' of the servers. To make the "Uptime" column visible, add the following line in the "Column definitions" section:
{"title": "Uptime", "id": "uptime", "func": col_uptime, "sType": "string", "visible": True},
Also, add the following lines in the "Column functions" section :
<%def name="col_uptime(host, **kwargs)">
${jsonxs(host, 'ansible_facts.uptime', default='')}
</%def>
Whatever comes after the dot just after ansible_fact.<xxx> is the parent value in the JSON file. Repeat step 7. Here is how the end result looks like.
[caption id="" align="aligncenter" width="1024"]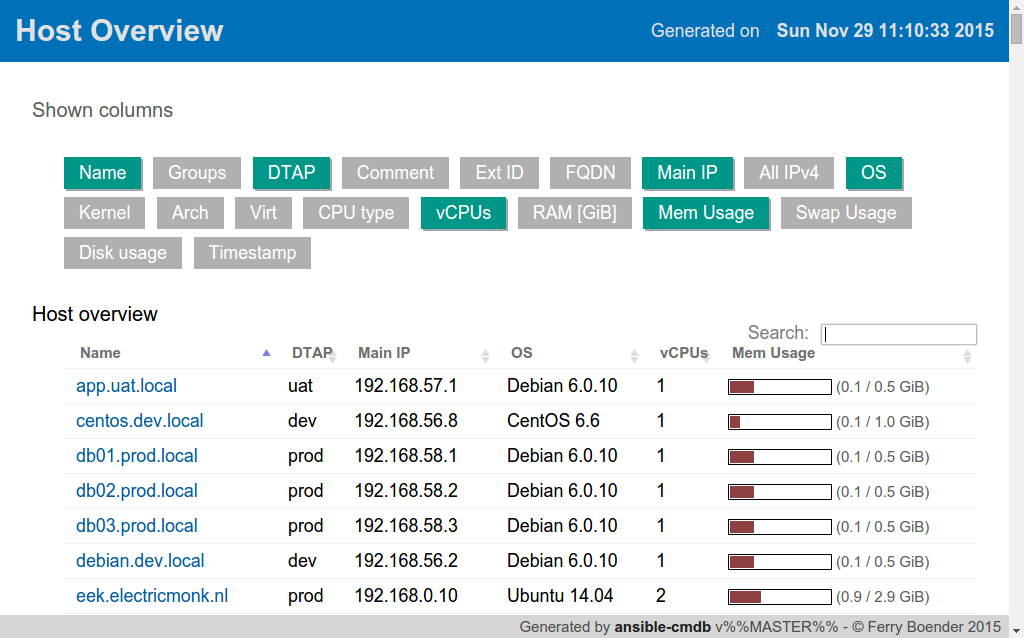 Photo credits: Ferry Boender[/caption]
Getting beyond Ansible-cmdb
Now, imagine that you want to include a specific application version (Example VMware tool version ) in the HTML inventory file. As I mentioned in part 4, I created the directory /home/Ansible-Workdesk. This where the "out" and "cmdb" directories have been created.
10. Create another directory called /home/Ansible-Workdesk/other_info/vmwaretool. I use this directory to deposit another JSON file for the VMware tool version after launching a playbook. Here is an extract from my InventoryUsingAnsibleCMDB.yml Playbook.
- setup:
  register: setup_res

- command: vmware-toolbox-cmd -v
  register: vmwareversion

- set_fact:
  vmwareversion: '{ "vmwareversion": {{ vmwareversion.stdout_lines }} }'
You can view the whole Ansible Playbook here on my Github.
11. Once the playbook has been executed, you will have identical files name in /home/Ansible-Workdesk/out and /home/Ansible-Workdesk/out/other_info/vmwaretool.
12. However, the content will be different. The one in the "out" directory will contain JSON files about the default Ansible inventory, whilst, the one in the "vmwaretool" directory will contain a JSON file about the VMware tool version having its parent as "vmwareversion". I change the parent from "stdout_lines" to "vmwareversion" using the set_fact module in Ansible.
13. By now, you are ready to tweak the html_fancy_defs.html again as described in part 9. Both the Column definitions and Column functions need to be appended. Here is the line to be added in the Column definitions section:
{"title": "VMware Tool", "id": "vmwareversion", "func": col_vmwareversion, "sType": "string", "visible": True},
And that of the Column functions section:
<%def name="col_vmwareversion(host, **kwargs)"> ${jsonxs(host, 'vmwareversion', default='')} </%def>
14. Repeat steps at part 7 with the "vmwaretool" directory.
ansible-cmdb -t html_fancy_split out/ out/other_info/vmwaretool/
In case, you are able to create an Ansible Playbook to create valid JSON files by merging those in the vmwaretool directory to that of the out directory, please comment below. I would like to hear more about it.
Tips:
- More Playbooks can be found on my Ansible-Playbooks Github repository.
- With regards to part 3, if direct root access has been disabled on the destination servers, you can use -u <username> which will permit you to connect on the server.
- The ansible-cmdb command also allows you to generate CSV file.
- Part 10 lays emphasis on a separate JSON file. If you have been able to merge both outputs on the same JSON file that has been created by ansible default inventory please comment below.
- The group in the ansible host file can also be added to the server inventory html file. Please see the ansible-cmdb doc for more information.